Starting your first Shopify store is simple, but improving its performance and understanding customer behavior takes more effort. That’s where Meta Pixel comes in!
Formerly known as Facebook Pixel, this tool provides valuable insights into customer activity on your Shopify store, helping you make smarter marketing decisions.
Meta Pixel is packed with features that can boost your store’s conversions and grow your business. Best of all, setting it up is quick, free, and easy — I did it in just a few minutes.
Follow the guide below to learn how Meta Pixel can transform your Shopify store.
What Is Facebook (Meta) Pixel And How It Works?
Earlier known as Facebook Pixel, Meta Pixel for your Shopify store is honestly one of the most confusing integrations that I’ve come across.
Still, it proves to be an effective method to channel and grow marketing efforts taken for your Shopify store.
Meta Pixel is a code that you can add to your Shopify store, and adding this code gives out critical customer information, including the visitors’ names, locations, and email addresses, which you normally don’t do without Meta Pixel integration.
Plus, you can keep track of conversions, create custom audiences, and target your ads to a specific group of people. Find more details on custom audiences here.
What Does Facebook Pixel Track?
Meta Pixel, if integrated, can scrape out valuable pieces of information from a total of 17 events. Some important data that Meta Pixel tracks are:
- The actions that people take
- Page visits
- Shopping cart behavior
- Depth of scrolling
- Purchase
Here is the entire list of the events that Meta Pixel can track.
Features of Facebook (Meta) Pixel
Coming to the features and how Meta Pixel integration can help your Shopify store, here are 4 key features offered.
- Optimized ads
- Track cross-device conversions
- Custom audience creation
- Enhanced website traffic information
Stick to the end to find more details on how these features can help you and your Shopify business.
Did you know? – The United States accounts for 50% of the total Shopify merchants, with 875,000 merchants.
How To Setup Meta (Facebook) Pixel For Shopify?
To begin setting up Facebook Pixel, there are two prerequisites – having a live Shopify account and creating a pixel.
I will be showing the steps next, right from creating a Pixel. Let’s begin!
Step 1: Creating A Pixel
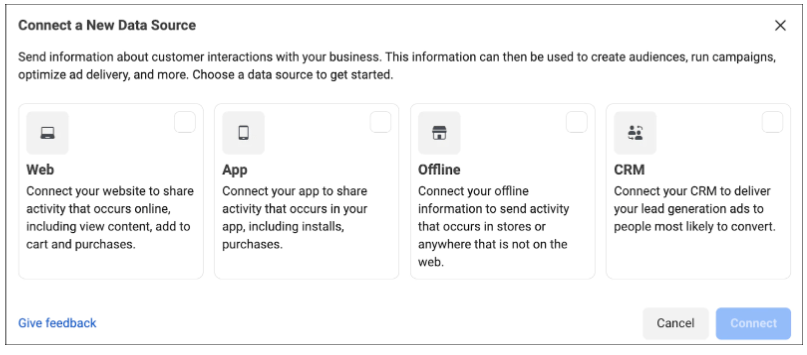
To create a pixel, click the green “plus” symbol from the Meta events manager. You will see the below options to choose the data source you want this Pixel to use.
Step 2: Name The Created Pixel
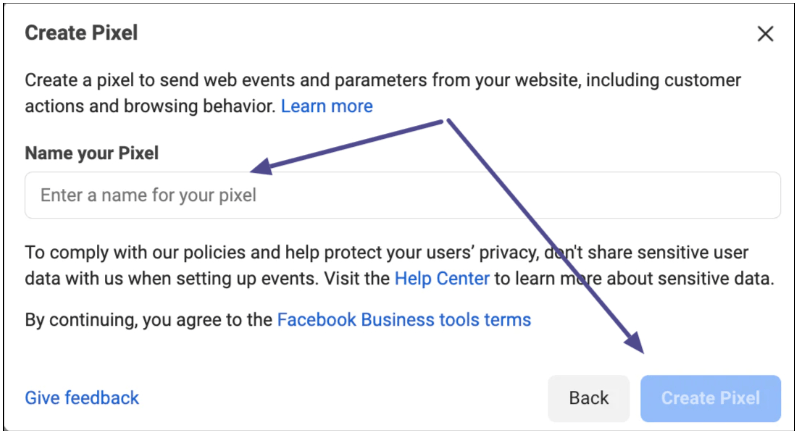
In the next step, name the created Pixel with the name of your choice and click “Create Pixel.”
Step 3: Partner Integration
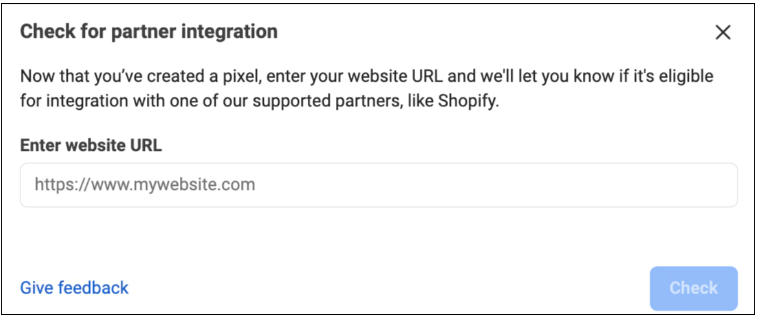
The next step is to check for partner integration. Insert your website URL and click “check.”
Once through, you can head to the next step.
Step 4: Select How To Connect The Website
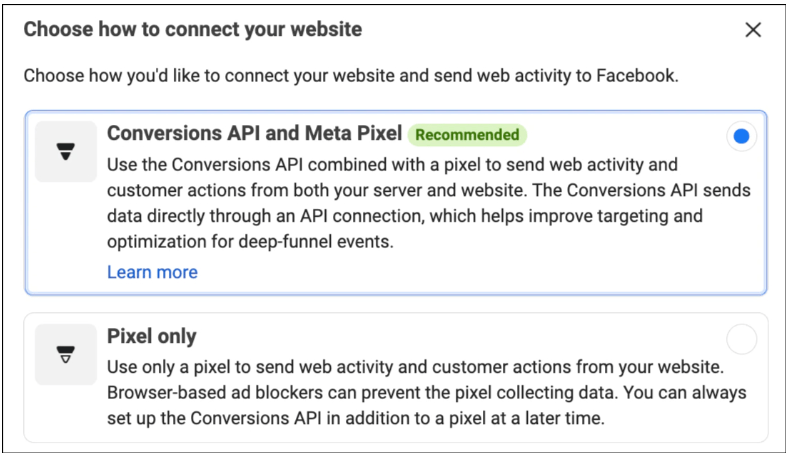
The ones who are through can choose the ways they wish to share their Shopify store activity with Meta. There are two options – Conversions API with Meta Pixel or just the Meta Pixel integration.
Step 5: Set Up Conversions API Or Pixel And Check For A Partner
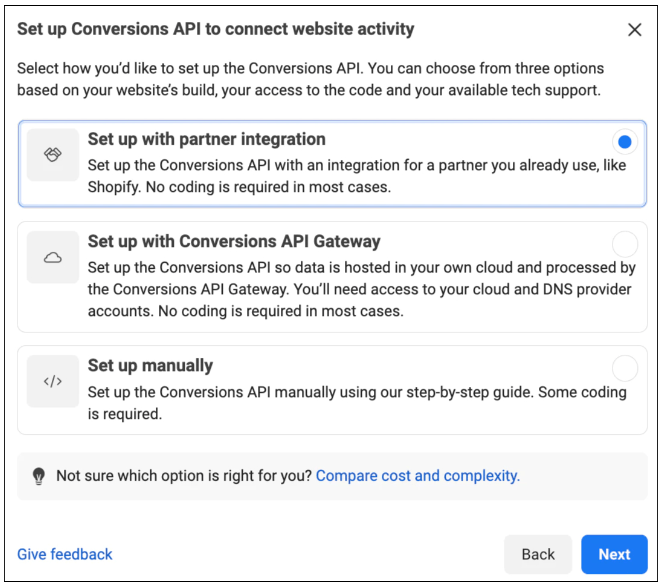
This step would vary depending on the option you choose on the step above. If you select to go with conversions API, you need an extra step to choose how you want to set it up, as seen below:
Pro tip: Choose to go ahead with partner integration for the smoothest experience.
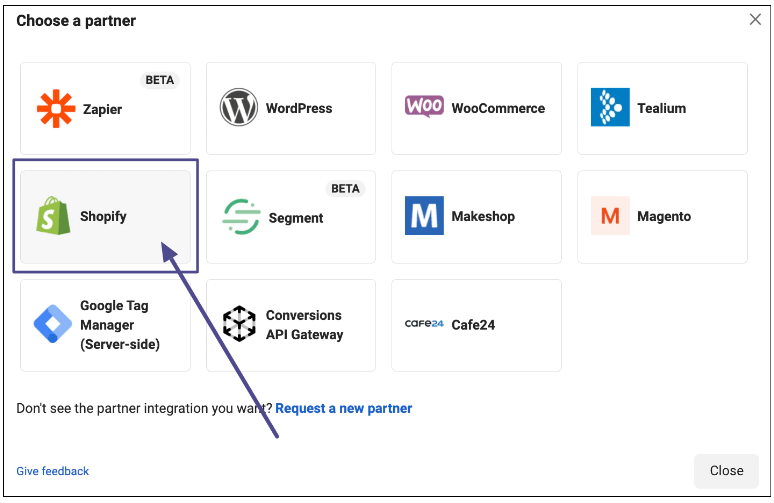
Step 6: Select The Partner As Shopify
In this final step, select the partner you wish to go ahead with, in this case – Shopify.
And that’s it: you’ve completed the process of creating and integrating a Facebook Pixel into your Shopify store!
But this is only from the Facebook Pixel part. To complete the process, you will also have to integrate Shopify into Facebook.
Benefits Of Integrating Facebook Pixel Code
However, the Apple iOS 15 update has limited the information a Shopify merchant can get from user activity. Currently, you can get eight events per domain that are assigned automatically.
Yet, Facebook Pixel shows promise and has benefits to look at:
1. Increased ROI
Since Facebook Pixel allows you to target an audience that is highly likely to take action, more money you spend goes into utilization than before, thereby boosting the ROI (Return On Investment).
2. Customer Tracking
With conversion tracking, analyzing the user activity on your ads becomes easy. Small details like device switching can be tracked using the cross-device conversion feature.
3. Retarget Old Visitors
You can retarget old website visitors who did not complete an action by showing them custom ads for the products they viewed or didn’t complete the payment for.
4. Enhanced Analytical Data
Utilizing Facebook Pixel on Shopify enables you to dive deep into understanding customer behavior across your Shopify store.
This benefit can prove more valuable than all other benefits combined. Getting conversions is a piece of cake if you understand your customers well and what they want.
Tips For Facebook Ads Set Up For Shopify
To strengthen your Facebook pixel’s potential, here are a few critical suggestions to help you dynamically grow your outcome.
1. Focus On Custom And Lookalike Audiences
Target your efforts on custom audiences, which are your existing audiences, and lookalike audiences, who share similar interests as your existing ones.
This increases the chances of favorable outcomes for your Shopify store.
2. Use Conversions API
As seen in step 4 above, Facebook allows you to connect your Shopify store, including with Conversions API, which gets you data about customer actions from both the server and the website.
This is an improved way to target and optimize as the data is received via API directly. Learn more on Conversions API from Meta’s official blog on Conversions API.
3. Try Dynamic Ads
These are basically ads that are seen by users but not necessarily similar for all. Dynamic ads are automatically run depending on the customer’s behavior and past actions to improve conversions.
Related Reads:
Conclusion: Adding Facebook Pixel To Shopify Is Worth It!
Having Facebook Pixel on your Shopify store in 2025 can dynamically change the way you target your audience with newer and more efficient ways to target new and old website visitors.
Adding a Pixel to your Shopify store is easy, too, and can be further improved by including the Conversions API.
This functionality, combined with Shopify’s powerful analytic features, can help you pinpoint your Shopify store audience and track the store’s performance accurately.
While this is not as beginner-friendly as running a basic store, using Facebook Pixel on Shopify demands effort and expertise. Hence, make sure you know everything about it before signing up!
FAQs
The Facebook Pixel is free to use and integrate into your Shopify store. But check the terms and conditions for using it before installing it.
You can add the Pixel code to your store manually by copying it from the events manager and pasting it into your theme.
The Facebook Pixel can track a visitor’s activity with 17 events like – page views, time spent, cart and purchase activity etc.

